
How to Use the Wavytalk 5-in-1 Curling Wand Set
 By Ashley Rubell Published
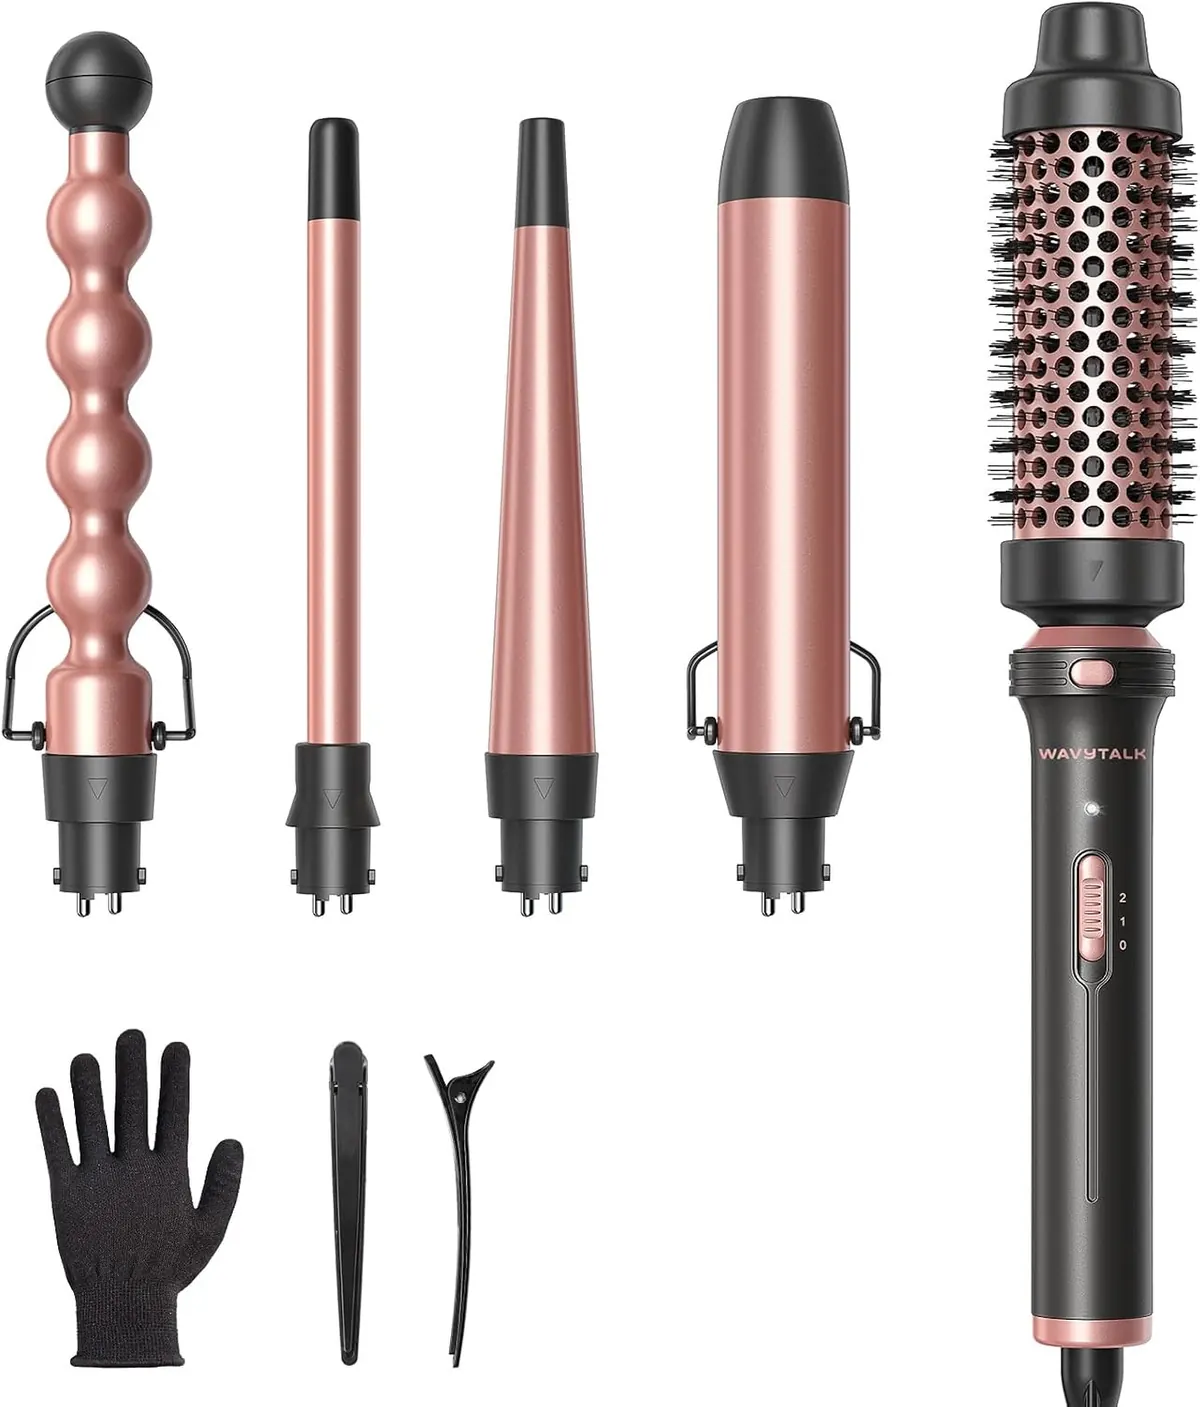
Interchangeable ceramic set with a 1" bubble barrel, 0.5" small wand, 0.5–1" tapered
Shop now
Choose the attachment before heating the Wavytalk 5-in-1 Curling Wand Set. Each barrel shapes the hair differently, so an intentional first choice avoids a mid-session change. Start with dry, sectioned hair and use the attachment's temperature range rather than assuming the thermal brush shares the wand settings.
Set out the pieces before starting
The set includes four wands, a thermal brush, two salon clips, a glove and a flannel storage bag. Lay out only the attachment you plan to use and keep the other pieces away from the working area. Use the clips to separate hair so that loose sections do not fall into the section you are styling.
Fit the attachment with the handle unplugged and cool, following its fitting instructions. Make sure it is properly seated before powering on. A review on Wavytalk's page mentions hair catching near the barrel-to-handle groove, so keep the section clear of that join. Do not try to exchange a hot attachment just to adjust the finish halfway through.
Read the temperature for the mounted attachment
Wavytalk gives the wands two settings: 356°F / 180°C and 410°F / 210°C. The thermal brush instead uses 302°F / 150°C and 356°F / 180°C. The shared handle can therefore produce a different temperature depending on the piece. Confirm what you have mounted before choosing the setting.
The brand quotes heat-up in about 30 seconds and suggests the higher wand setting for thick, coarse or hard-to-curl hair. That is not a requirement to use maximum heat. Begin lower if unsure and follow the tool's instructions. No single setting or hold time can promise the same result for every head of hair.
Use the micro wand for a defined spiral
The 0.5-inch micro wand is the narrowest option. Wavytalk's method uses small sections wrapped closely around the barrel for tighter ringlets. It is also the piece to consider when hair is too short to wrap meaningfully around a larger wand. Work on one manageable section rather than covering the barrel with an uneven bundle.
Check the result of that first section before committing to the whole head. If it is tighter than the finish you want, choose a different attachment once the tool has cooled instead of assuming a wider section will reliably duplicate a larger barrel. Diameter is part of the choice, not a detail to correct with extra heat.
Orient the tapered wand from wide to narrow
The 0.5-to-1-inch tapered wand changes diameter along its length. Position the wider end near the root area, without contacting the scalp, and wrap toward the narrower tip. Wavytalk describes this as giving more volume toward the top and tighter definition toward the ends.
Keep track of where each section sits on the taper. Two sections wrapped over different portions of the barrel will not receive the same shape even if they are the same size. When you want a consistent result, repeat the placement as well as the direction of the wrap.
Let the bubble shape guide the section
For the 1-inch bubble barrel, Wavytalk recommends pointing it downward and winding the hair between the bubbles. This produces a more textured bend than wrapping around a plain, uniformly round wand. Guide the section into those spaces instead of treating the raised parts as a smooth cylinder.
Do not judge the result against the micro wand's spiral. They serve different styling goals. If you want a uniform, classic curl rather than a textured wave, the straight wand is the more relevant comparison. Decide on that finish while the attachments are still cool and easy to handle.
Wrap evenly on the largest wand
The 1.25-inch wand is the largest of the four and is intended for loose, classic curls. Spread the section evenly along the barrel rather than piling the hair into one area. An orderly wrap makes it easier to repeat the same shape on the next section.
Hair length affects how much can wrap around a given diameter. If you are uncertain which piece matches your length and desired shape, use the curling iron barrel size guide before starting. Avoid choosing the largest barrel purely because it appears faster; the resulting bend still has to suit the hair you can wrap.
Treat the thermal brush as a styling tool
Wavytalk lists the brush at about 1.5 inches, also given as roughly 1.49 inches in some details. Its method is to wrap, twist and glide through the ends, using the bristles to guide the hair. It is intended for a round-brush finish, crown volume and bangs.
This attachment has no airflow and is for dry hair only. It cannot take the place of drying wet hair. Keep that distinction clear when planning the routine, especially if you are accustomed to a dryer brush that looks similar.
Change one thing when a section looks wrong
If neighboring sections look different, compare their size and wrapping position first. On the tapered wand, placement along the barrel changes the shape; on the bubble barrel, placement between the bubbles matters. Check that the section stayed clear of the handle join. Turning the heat up does not correct an inconsistent wrap.
Use a section that has already cooled as a reference for the finish you are aiming to repeat. Avoid repeatedly reheating the same piece while changing several variables. If the attachment is giving the wrong type of curl, stop and allow the tool to cool before changing it. Follow the supplied instructions for heat exposure rather than extending the hold without guidance to force a different shape.
Cool, pack and decide what you actually use
Let the unplugged tool and attachments cool fully before storing them in the supplied bag. The set is dual voltage, rated 120–240V, with a 79-inch cord; check the plug requirements for travel rather than assuming voltage compatibility covers the plug shape too.
If your routine repeatedly uses only a few shapes, compare the 3-in-1 Curling Wand Set in Curling Wands. Choose the attachments you will use, without treating a larger set as a promise of longer-lasting curls.